How to Use iPhone as a Webcam for Mac for Free
Now that working from home is the norm, use of video conferencing became more prevalent than ever. At work we use it to hold meetings, manager chats and even happy hours. Even though casual wear is the standard in tech for everyday work, I’m always conscious about how I present myself to others and in this case, how I look on video. While the built-in webcam on my Macbook is great and all, due to how my screens and computers are laid out on my desk, it’s not at the most ideal position for video calls. I considered buying a dedicated webcam, but due to COVID-19 inventory has been scarce and prices have skyrocketed. I then remembered that I had an old iPhone lying around so I decided to convert that into a webcam. Here I will go through an easy and free way to set it up for your Mac.
Note that this is based on a tutorial I saw by Andrew Odri with some modifications and added visuals.
CamTwist Studio (Free)

CamTwist Studio is a free app that allows your Mac to detect your iPhone as a source input. It provides a virtual camera input that you can use on various 3rd party video conferencing apps like Zoom, Google Meet, etc. Note that I have only tested this on Google Meet, but the same idea applies for others.
For this tutorial, I’m running on macOS 10.13 and an iPhone 6S.
Step 1:
On your Mac, install CamTwist Studio. Note that you may have to override your macOS security setting in order to install it, especially if you’re on macOS 10.15 Catalina. See section “How to open an app that hasn’t been notarized or is from an unidentified developer” on Apple’s support page.
Step 2:
By default CamTwist Studio is not configured for high-definition, so we want to change that. Open CamTwist Studio, click on CamTwist -> Preferences menu. In the window that appears, under Video Size select Custom, then enter 1920 and 1080 in the respective boxes as shown below.
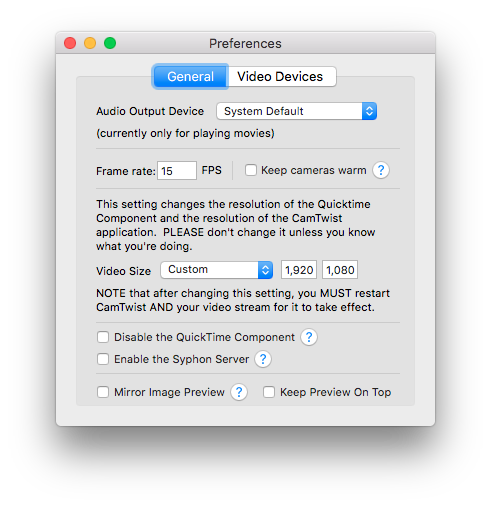 Restart CamTwist Studio in order for the settings to take effect.
Step 3:
On your iPhone, download a minimalistic camera app. A minimalistic camera app would have few to zero camera controls on the UI, as CamTwist is feeding what is shown on the iPhone screen directly. A decent app is True Visage, which you can download for free. Ensure you have disabled notification so it doesn’t display any pop ups while you have the app open, and disable auto-locking to keep the feed running.
Step 4:
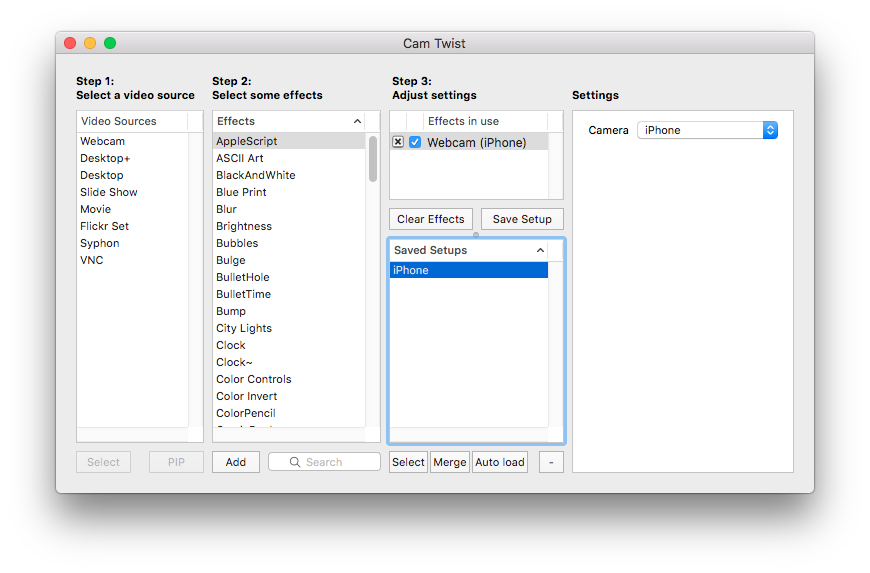
Connect your iPhone to your Mac using a USB cable. In the main CamTwist window, select Webcam in the video sources list, click on the Select button, then in the newly-shown Camera list, select iPhone. Click on Save Setup so it gets properly applied.
Step 5:
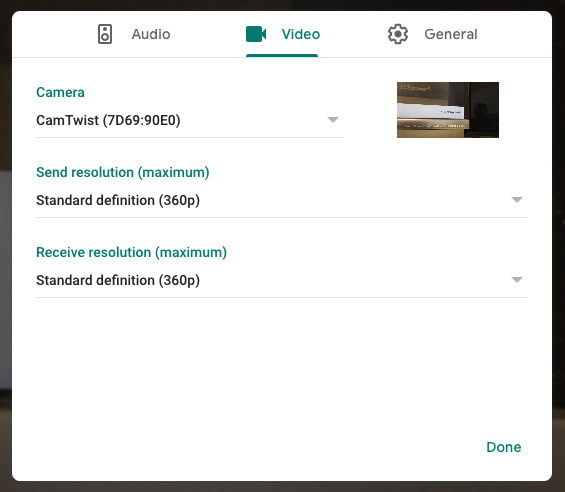
Go to your video conferencing app. Make sure you restart the app in order to detect the new virtual camera that was installed as part of CamTwist Studio. For example, I’m using Google Meet so I need to restart Chrome. In the call settings, go to Video, select CamTwist in the Camera selection. You do not need to set the Send/Receive resolution setting.
Now you should be able to see the feed coming in from your iPhone camera. Note that you must always have CamTwist running at all times, if at any point the app terminates, a test pattern and a logo appears instead, and you need to restart the vc app / CamTwist to get it working again.
I hope that this helped make use of your old iPhones that are otherwise collecting dust and save some money from buying an overpriced webcam. Let me know what worked / didn’t work for you by leaving a comment below!

Leave a comment